Script to video AI sounds simple.
Paste a script. Click a button. Get a finished video.
But anyone who has tried to make serious faceless YouTube videos knows the truth: the hard part is not generating one random AI clip.
The hard part is turning a complete YouTube script and voiceover into a real video workflow.
A finished faceless video needs structure. It needs scenes. It needs visuals that match the narration. It needs captions. It needs background music. It needs pacing. It needs a visual style. It needs export controls. And most importantly, it needs to follow the script instead of drifting into random AI visuals that look impressive but say nothing.
That is where most AI video tools break.
They can create clips. They can generate visuals. They can make short demos. But they often do not solve the full creator workflow from script to final faceless YouTube video.
That is why script to video AI matters.
For YouTube creators, the real workflow is:
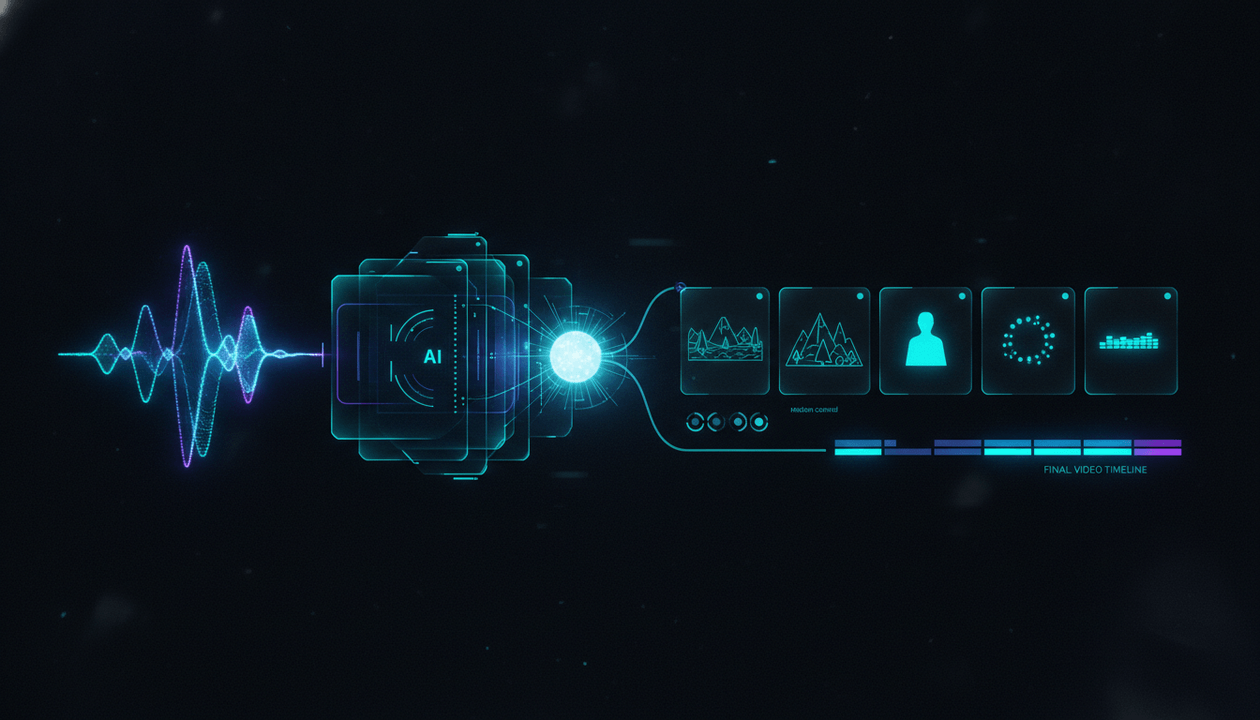
script → voiceover → scenes → visuals → captions → music → motion → export
Not:
prompt → random clip
This guide will show you how to turn a YouTube script and voiceover into a faceless video, what the best script to video AI workflow should include, and how Auto Edit Studio inside OverseerOS helps creators move from narration to production faster.
If you already have a script and voiceover ready, you can turn your script and voiceover into a faceless video with OverseerOS Auto Edit Studio.
Key Takeaways
- Script to video AI helps creators turn a finished script into a video production workflow.
- For faceless YouTube creators, the voiceover should guide scene timing, captions, pacing, and visual structure.
- The best workflow is not text-to-random-video. It is script-and-voiceover-to-scene-based-video.
- A serious faceless video workflow includes script intake, voiceover alignment, scene splitting, AI visuals, captions, music, motion, style direction, and export controls.
- Auto Edit Studio inside OverseerOS is built for creators who already have a topic, script, and voiceover and want to move into production faster.
- Script to video AI does not replace strategy, topic selection, thumbnails, hooks, or retention. It helps remove the production bottleneck after the creative direction is clear.
- You can review how Auto Edit Studio works for the deeper feature breakdown.
What Is Script to Video AI?
Script to video AI is a workflow that turns written video scripts into visual video projects.
For YouTube creators, this usually means taking a finished script and using AI to help create:
- Scene structure
- Visual prompts
- AI-generated images or clips
- Captions
- Background music
- Motion
- Transitions
- Export-ready video assets
A basic script to video AI tool may only generate a video from pasted text.
A stronger workflow uses both the script and the voiceover.
That matters because the voiceover controls timing.
The script tells the system what the video is about. The voiceover tells the system how long each part should feel.
Together, they create the backbone of a real faceless YouTube video.
Script to Video AI vs Text to Video AI
These two terms sound similar, but they solve different problems.
Text to video AI usually means:
Type a prompt and generate a clip.
Script to video AI means:
Take a finished script and turn it into a structured video.
For faceless YouTube creators, script to video AI is usually more useful.
Why?
Because a faceless YouTube video is rarely built from one prompt.
It is built from a full narration.
A text-to-video prompt might be:
Create a cinematic video about AI changing YouTube.
A script-to-video workflow starts with:
Here is the full 1,800-word script. Here is the voiceover. Break it into scenes, match visuals to each section, add captions, music, and motion, then prepare the project for export.
That is much closer to how real creators work.
Why Voiceover to Video AI Matters
Voiceover to video AI is the missing piece in many AI video workflows.
A script alone is useful, but a voiceover gives the production system timing.
The voiceover helps decide:
- When a scene should start
- When a scene should end
- How captions should appear
- How fast visuals should change
- How long the full video should be
- Where the pacing needs more energy
- Where the story needs a visual reset
This is why serious faceless video workflows should not ignore voiceover.
The narration is the timeline.
If the video generator does not understand the voiceover, the creator often has to fix timing manually later.
That is exactly the kind of bottleneck script to video AI should remove.
Why Faceless YouTube Creators Need This Workflow
Faceless creators usually work differently from on-camera creators.
They do not record themselves speaking directly to the camera.
Instead, they often work with:
- Topic researchers
- Scriptwriters
- Voiceover artists
- AI voiceover tools
- Editors
- Thumbnail designers
- Channel managers
- AI visual tools
- Caption tools
- Stock footage libraries
- Music libraries
That can become messy fast.
A creator may have a great script and voiceover, but the video still gets stuck because production requires too many handoffs.
The editor needs to understand the script. The visual prompts need to match the narration. The captions need to match the voiceover. The music needs to support the pacing. The scenes need to feel consistent. The final export needs review.
Script to video AI helps by turning the narration into a production structure.
Instead of starting from a blank editing timeline, the creator starts from scenes.
That changes everything.
The Full Script to Video AI Workflow
Here is the correct workflow for turning a YouTube script and voiceover into a faceless video.
Step 1: Start With a Proven Topic
Do not start production until the topic is worth making.
A weak topic will not become strong just because the video looks polished.
Before using script to video AI, ask:
- Who is this video for?
- What does the viewer want?
- What pain or curiosity does the topic solve?
- Has this topic shown demand in the niche?
- What competitor videos prove demand?
- What angle makes this version original?
- Why should the viewer watch this video now?
This is where a content planning workflow matters.
Inside OverseerOS, creators can use a YouTube content planner workflow to plan topics from public YouTube evidence, competitor signals, scripts, voiceovers, and production status before moving into Auto Edit.
The better the topic, the better the production workflow will perform.
Step 2: Write a Script Built for Scenes
Not every script is ready for video.
A weak script sounds like an essay.
A strong faceless YouTube script is built for visual scenes.
That means it has:
- A strong hook
- Clear sections
- Shorter paragraphs
- Visual moments
- Examples
- Transitions
- Payoffs
- Scene-friendly pacing
Bad script structure:
AI is changing many industries. In this video, we will discuss how artificial intelligence is changing content creation and what creators should know.
Better script structure:
AI did not make YouTube easier. It made weak videos easier to produce. And that is why faceless creators need a new workflow.
The second version gives the video a visual and emotional direction.
It is easier to turn into scenes.
Step 3: Create or Upload the Voiceover
Once the script is ready, create the voiceover.
This can be:
- Your own recorded voice
- A hired voiceover artist
- An AI-generated voiceover
- An ElevenLabs-powered voiceover workflow
- A voiceover attached inside your creator planning process
OverseerOS includes an AI YouTube voiceover generator workflow powered by ElevenLabs for creators who want to turn scripts into audio without leaving the creator system.
The important thing is that the voiceover should be final or close to final before video production begins.
If you change the voiceover later, you may affect:
- Scene timing
- Caption timing
- Visual pacing
- Export length
- Music alignment
In script to video AI, the voiceover is not just audio.
It is the timing map.
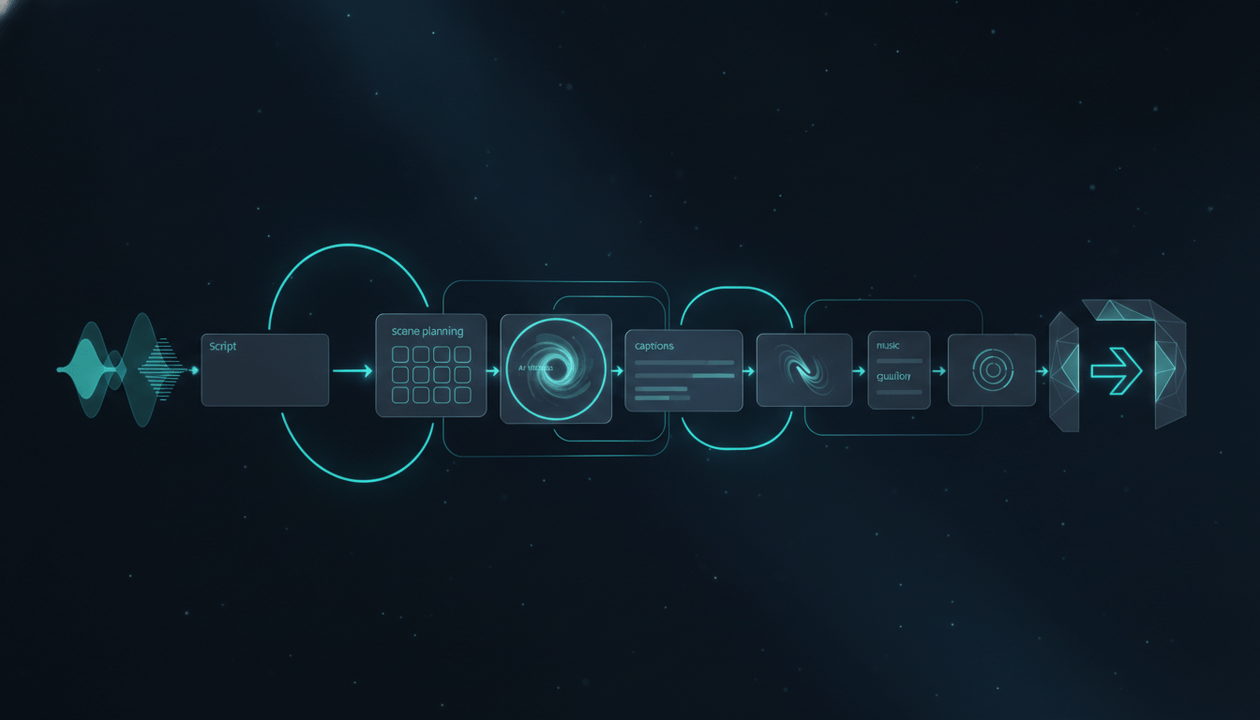
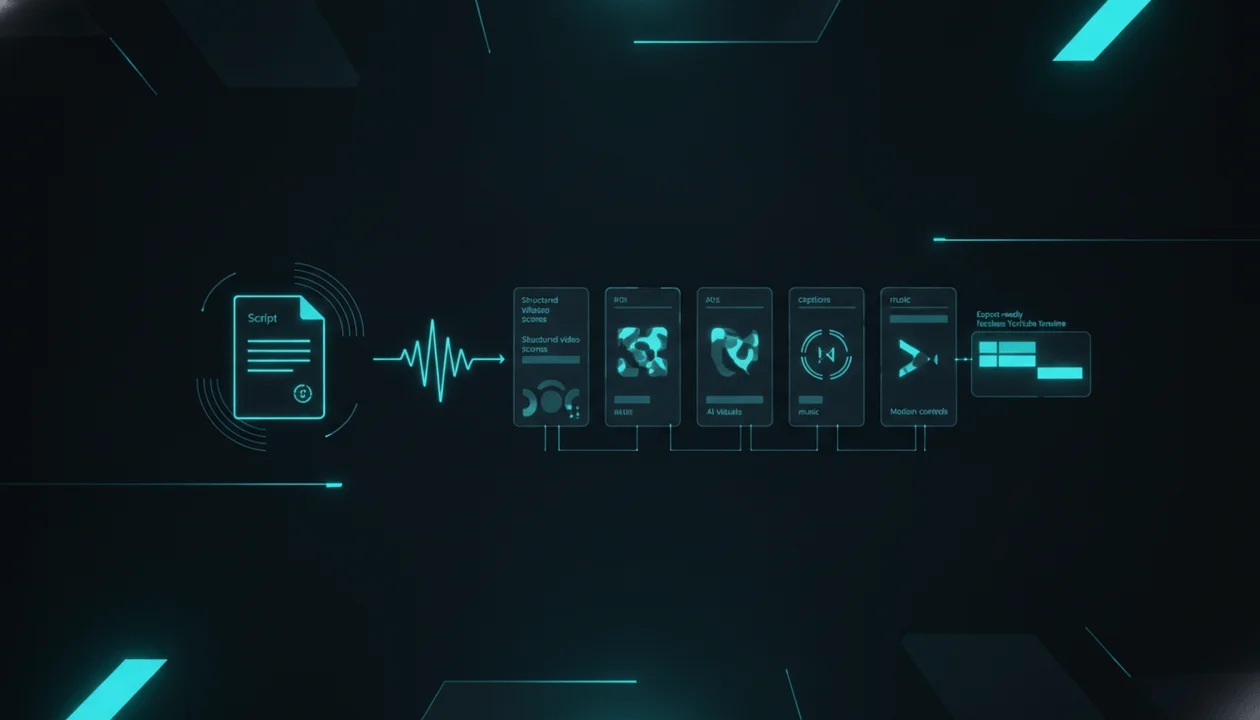
Step 4: Bring the Script and Voiceover Into Auto Edit Studio
This is where Auto Edit Studio becomes the production layer.
Instead of starting with a blank timeline, you start with the two most important assets:
- The script
- The voiceover
Auto Edit Studio is designed to help creators turn that narration into a structured faceless video workflow.
You can review how Auto Edit Studio works to see the detailed production flow.
The key idea is simple:
The script gives the video meaning. The voiceover gives it timing. Auto Edit uses both to build the production structure.
Step 5: Choose Shorts or Long-Form
Before generating scenes, choose the output format.
Shorts and long-form videos need different pacing.
Shorts usually need:
- Faster scene changes
- Vertical framing
- Strong captions
- Immediate hook
- Less context
- More visual punch
Long-form videos usually need:
- More structure
- Deeper scene progression
- Better pacing variation
- More examples
- Stronger retention planning
- More visual consistency
A script to video AI workflow should know which direction you are producing for.
A 45-second Short and a 12-minute documentary should not be structured the same way.
Step 6: Turn Narration Into Scenes
This is the core step.
The system should split the narration into scenes based on the script and voiceover.
Each scene becomes a production block.
A scene may include:
- A section of narration
- Scene timing
- Visual direction
- AI image or clip prompt
- Caption timing
- Motion instructions
- Style notes
- Regeneration controls
This makes the video much easier to manage.
Instead of trying to manually edit one long narration track, the creator can work scene by scene.
That is especially important for faceless YouTube channels because visual structure is what replaces the on-camera personality.
Step 7: Set the Visual Style Direction
Visual consistency matters.
A faceless video can feel cheap if every scene looks like it came from a different universe.
Before generating visuals, set the style direction.
Examples:
- Dark cinematic documentary
- Clean modern explainer
- Premium AI tech style
- Historical documentary realism
- Minimal educational graphics
- High-contrast mystery style
- Soft psychology storytelling visuals
- Financial editorial style
- Futuristic SaaS interface style
A weak style prompt says:
Make it cool.
A stronger style direction says:
Dark cinematic tech documentary style, premium lighting, realistic AI workstation environments, deep blue tones, subtle camera motion, no cartoon visuals, no exaggerated faces.
That gives the AI a much clearer direction.
Auto Edit Studio supports style direction workflows so creators can guide the visual identity of the project instead of letting every scene drift.
Step 8: Generate AI Visuals for Each Scene
Once the scenes and style direction are ready, generate visuals.
Good AI visuals should match the narration.
If the voiceover says:
Most AI video tools create clips, but faceless creators need a production workflow.
A weak visual might show a generic robot.
A stronger visual might show a creator dashboard where a script, voiceover waveform, scene cards, captions, and export timeline are connected into one workflow.
The difference is relevance.
Scene visuals should do one of four jobs:
| Visual Job | Purpose |
|---|---|
| Explain | Help the viewer understand the idea |
| Prove | Show evidence, process, or example |
| Support | Reinforce mood and pacing |
| Transition | Move the viewer into the next section |
Avoid visuals that only look nice.
Nice but irrelevant visuals create AI slop.
Step 9: Review and Regenerate Weak Scenes
AI generation still needs human review.
Do not accept every output just because it exists.
Review each scene and ask:
- Does this visual match the narration?
- Does it support the viewer’s understanding?
- Does it fit the style?
- Is it too generic?
- Is it misleading?
- Does it repeat the previous scene too closely?
- Does it look cheap?
- Does it break visual consistency?
Regenerate weak scenes.
Replace visuals where needed.
A script to video AI workflow should speed up production, not remove quality control.
Human judgment is still the difference between a usable video and generic AI content.
Step 10: Add Captions
Captions are essential for many faceless videos.
They help with:
- Clarity
- Accessibility
- Retention
- Shorts performance
- Viewer comprehension
- Mobile viewing
Captions should be readable and timed properly.
For Shorts, captions often become part of the visual identity.
For long-form videos, captions should support clarity without overwhelming the screen.
Good captions do not just show words.
They guide attention.
Step 11: Add Background Music
Music gives the video emotional flow.
A script to video AI workflow should support background music because faceless narration can feel flat without atmosphere.
Use music carefully.
The voiceover must stay clear.
Music should support the mood, not fight the narration.
Examples:
| Video Type | Music Direction |
|---|---|
| AI news | Futuristic, focused, light tension |
| History documentary | Cinematic, serious, slow build |
| Psychology | Soft, reflective, emotional |
| Finance | Clean, confident, minimal |
| Mystery | Dark, suspenseful, restrained |
| Tutorial | Light, modern, low-distraction |
The wrong music can make a good script feel cheap.
Step 12: Add Motion, FX, and Transitions
Motion helps static visuals feel alive.
For faceless videos, this can include:
- Slow zooms
- Subtle pans
- Scene transitions
- Motion clips
- FX
- Logo controls
- Visual pacing changes
The goal is not to over-edit.
The goal is to keep the viewer engaged without distracting from the narration.
A video should feel produced, not chaotic.
Step 13: Export the Video
The final step is export.
Before exporting, review:
- Does the first 10 seconds match the title promise?
- Are captions readable?
- Is the voiceover clear?
- Is the music too loud?
- Do visuals match the script?
- Are any scenes visually weak?
- Does the pacing feel natural?
- Does the ending deliver a payoff?
- Is the output format correct for Shorts or long-form?
Then export.
This is where the script finally becomes a video.
If you want the full production path in one workflow, you can turn your script and voiceover into a faceless video with OverseerOS Auto Edit Studio.
Why Script to Video AI Is Better Than Prompt-to-Video for YouTube
Prompt-to-video is useful for experiments.
But for YouTube, it often lacks structure.
A single prompt cannot fully understand:
- Your audience
- Your title promise
- Your hook
- Your pacing
- Your voiceover timing
- Your examples
- Your scene order
- Your channel style
- Your retention plan
- Your final payoff
A script can.
That is why script to video AI is stronger for faceless YouTube creators.
The script already contains the creative direction. The voiceover already contains the timing. The AI production workflow should build around both.
That is how you avoid random visuals.
Script to Video AI Workflow Example
Let’s say you have a video titled:
AI Is Making Faceless YouTube Easier and More Dangerous
A weak prompt-to-video workflow might be:
Make a video about AI and faceless YouTube.
That may create nice visuals, but it will not understand the argument.
A stronger script to video AI workflow looks like this:
Script Section
AI did not remove the need for strategy. It made bad strategy faster. A creator can now generate scripts, voiceovers, thumbnails, and visuals quickly, but if the topic is weak, the video will still fail.
Voiceover Timing
The narration lasts 18 seconds.
Scene Direction
Show a faceless creator dashboard where AI-generated scripts, voiceovers, thumbnails, and video timelines multiply quickly, while a warning signal highlights weak strategy.
Caption Focus
AI made bad strategy faster.
Visual Style
Dark premium tech documentary style, clean interface visuals, cinematic lighting, no cartoon robots.
Production Result
The scene supports the exact idea in the narration.
That is the difference.
The AI is not just generating video. It is following the script.
Common Mistakes With Script to Video AI
Mistake 1: Starting With a Weak Script
If the script is bad, the video will still feel weak.
AI visuals cannot save a script with:
- No hook
- No structure
- No examples
- No tension
- No payoff
- No viewer promise
- No original angle
Fix the script first.
Then use script to video AI.
Mistake 2: Using AI Visuals as Decoration
Random visuals create weak videos.
Every visual should support the narration.
If the viewer could remove the visual and lose nothing, the scene may be too generic.
Mistake 3: Ignoring the Voiceover
The voiceover controls timing.
If you generate visuals without respecting the voiceover, the video can feel disconnected.
The best workflow uses voiceover timing as the backbone.
Mistake 4: Overusing Effects
Motion and FX help, but too much can hurt the video.
Do not add movement just to add movement.
Use motion to support pacing.
Mistake 5: Skipping Human Review
AI can speed up production, but it cannot replace taste.
Creators still need to review:
- Scene relevance
- Visual consistency
- Caption readability
- Pacing
- Audio quality
- Hook strength
- Viewer payoff
Quality control is not optional.
Mistake 6: Expecting AI to Guarantee Views
Script to video AI helps with production.
It does not guarantee performance.
YouTube performance still depends on:
- Topic demand
- Title
- Thumbnail
- Hook
- Script quality
- Retention
- Audience fit
- Watch time
- Trust
- Consistency
Auto Edit Studio helps you build the video workflow faster.
It does not replace strategy.
Who Should Use Script to Video AI?
Script to video AI is best for creators who already have a clear content process.
Faceless YouTube Creators
If you make videos without appearing on camera, script to video AI can reduce the production gap between narration and final video.
YouTube Automation Teams
If you manage writers, voiceover artists, editors, and thumbnail designers, script to video AI can create a cleaner handoff from writing into production.
Multi-Channel Operators
If you run multiple channels, reducing manual production friction matters. A repeatable script-to-video workflow can help your team move faster.
Agencies
If you create YouTube content for clients, script to video AI can help standardize the production process while still allowing human review.
Shorts Creators
If your Shorts are narration-driven, script to video AI can help turn voiceovers into vertical scene-based videos with captions.
Long-Form Creators
If you make explainers, documentaries, educational videos, AI news, psychology videos, history videos, or finance breakdowns, script-to-scene production can save time.
Who Should Not Use Script to Video AI?
Script to video AI is not ideal if you want:
- A tool to choose your entire strategy
- Guaranteed viral videos
- One-click success with no review
- A replacement for title and thumbnail strategy
- A replacement for professional manual editing
- Frame-level control over every edit
- A way to copy another creator’s video exactly
- Low-effort mass production with no originality
A good tool helps you produce faster.
It does not make weak ideas strong.
Where Auto Edit Studio Fits in the OverseerOS Workflow
Auto Edit Studio is strongest when it is used as part of the broader OverseerOS creator workflow.
A complete workflow might look like this:
- Use OverseerOS to research channels and competitor signals.
- Save promising topics into the content planner.
- Write the script.
- Generate or upload the voiceover.
- Move the script and voiceover into Auto Edit Studio.
- Turn the narration into scenes.
- Generate AI visuals.
- Add captions, music, motion, and FX.
- Export the video.
- Create the thumbnail.
- Publish and review performance.
That is the real advantage.
Not just generation.
A connected creator workflow.
You can explore more OverseerOS creator tools if you want the full research, planning, scripting, voiceover, thumbnail, and production stack.
Script to Video AI Checklist
Before starting production, use this checklist.
Topic:
Is the topic proven or strategically chosen?

Angle:
Does this video have a clear point of view?

Script:
Is the hook strong?
Is the structure clear?
Are there examples?
Does the ending deliver?

Voiceover:
Is the narration final or close to final?
Is the pacing right?
Is the audio clean?

Format:
Is this a Short or long-form video?

Style:
What should the video look and feel like?

Scenes:
Can the narration be divided into clear visual sections?

Captions:
Should captions be full, selective, bold, minimal, or Shorts-style?

Music:
What mood should the background music support?

Motion:
Where does the video need movement?

Review:
Which scenes need regeneration or replacement?

Export:
Is the final format correct for YouTube?
If you cannot answer these questions, production will be weaker.
The tool works best when the creative direction is clear.
Practical Script to Video AI Template
Use this before opening Auto Edit Studio.
Video Title:
[Your working title]

Target Viewer:
[Who is this video for?]

Viewer Problem:
[What problem, curiosity, or desire does the video solve?]

Video Format:
[Shorts, long-form, explainer, documentary, tutorial, case study, list, story, etc.]

Script Status:
[Finished, needs rewrite, needs hook improvement, needs examples]

Voiceover Status:
[Recorded, generated, needs revision, not ready]

Visual Style:
[Describe the look and mood]

Scene Style:
[Fast-paced, cinematic, educational, minimal, documentary, etc.]

Caption Style:
[Bold Shorts captions, clean long-form captions, minimal captions, etc.]

Music Direction:
[Dark, cinematic, calm, energetic, premium, suspenseful, etc.]

Motion Direction:
[Subtle zooms, slow pans, fast cuts, cinematic movement, minimal motion]

Quality Standard:
[What would make this feel publishable?]

Final CTA:
[What should the viewer do after watching?]
This turns script to video AI from a random generation tool into a production workflow.
The Best Way to Use Script to Video AI in 2026
The best way to use script to video AI is not to automate everything blindly.
The best way is to use it after strategy.
A strong order looks like this:
Research first.
Angle second.
Script third.
Voiceover fourth.
Auto Edit fifth.
Thumbnail sixth.
Publish seventh.
Review eighth.
Creators get into trouble when they reverse this.
They open an AI tool first and ask it what to make.
That can create content, but it rarely creates a channel.
The strongest creators use AI after they know what the viewer needs.
Final Verdict
Script to video AI is one of the most important workflows for faceless YouTube creators in 2026.
But only if it solves the real production problem.
Creators do not just need random AI clips.
They need a way to turn a finished script and voiceover into a structured faceless video with scenes, AI visuals, captions, music, motion, and export controls.
That is the workflow Auto Edit Studio is built around.
It does not replace strategy. It does not guarantee views. It does not remove the need for a strong topic, title, thumbnail, hook, or script.
But it can remove a major production bottleneck.
If you already have the script and voiceover, the next question is simple:
How do we turn this into a video faster without losing quality?
That is where Auto Edit Studio fits.
Start with the script. Add the voiceover. Choose the format. Set the style. Generate scenes. Add captions and music. Review the output. Export.
If you want to move from narration to video production faster, use OverseerOS to turn your script and voiceover into a faceless video.
For the full product breakdown, read how Auto Edit Studio works.
FAQ
What is script to video AI?
Script to video AI is a workflow that turns a written video script into a visual video project. For YouTube creators, it usually includes scene structure, AI visuals, captions, music, motion, and export controls.
What is voiceover to video AI?
Voiceover to video AI uses a narration track to guide video timing, scene changes, captions, pacing, and visual structure. It is especially useful for faceless YouTube videos where the voiceover drives the entire video.
Can AI turn a YouTube script into a faceless video?
Yes. AI can help turn a YouTube script into a faceless video by generating scenes, visuals, captions, music, motion, and export-ready assets. The best workflow also uses the voiceover so the video timing matches the narration.
Is script to video AI better than text to video AI?
For faceless YouTube creators, script to video AI is usually better because it starts with a complete video script and voiceover instead of a single prompt. This creates a more structured and narration-aligned video.
What do I need before using script to video AI?
You should have a clear topic, a strong script, and a finished or near-finished voiceover. You should also know whether the video is for Shorts or long-form and what visual style you want.
How does Auto Edit Studio turn scripts into videos?
Auto Edit Studio starts with a finished script and voiceover, then helps structure the narration into scenes, generate AI visuals, apply visual style direction, add captions and music, use supported motion and FX, and move the project toward export.
Can Auto Edit Studio use AI voiceovers?
Auto Edit Studio can work with uploaded or generated voiceovers. OverseerOS also includes an AI YouTube voiceover workflow powered by ElevenLabs for creators who want to turn scripts into audio inside the broader creator system.
Can script to video AI create YouTube Shorts?
Yes. Script to video AI can be used for YouTube Shorts when the workflow supports vertical output, fast pacing, captions, and short narration-driven scenes.
Can script to video AI create long-form YouTube videos?
Yes. Script to video AI can help create long-form faceless videos, especially explainers, documentaries, educational videos, psychology videos, AI news videos, history videos, and finance breakdowns.
Does script to video AI guarantee YouTube views?
No. Script to video AI helps with production, not guaranteed performance. Views still depend on topic demand, title, thumbnail, hook, retention, audience fit, quality, and publishing strategy.